Skip to content

Reviews

How to Replace a Bathtub Step by Step Guide?

Replacing a bathtub can seem daunting. However, with the right tools and guidance, you can achieve a successful bathtub replacement. Whether you're remodeling your bathroom or upgrading an old fixture, this guide will serve as your roadmap.

Preparation is key. Gather all necessary materials and tools before starting. You’ll need items like a pry bar, a wrench, and possibly new plumbing components. The removal of the old bathtub requires caution. Be aware of any potential damage to walls or flooring.

Many homeowners overlook the preparatory steps. Rushing into the process can lead to mistakes. Each step, from disconnecting plumbing to sealing the new tub, is important. Take your time and ensure accuracy. Completing a bathtub replacement is rewarding, but patience is essential.

How to Replace a Bathtub Step by Step Guide?

Gathering Necessary Tools and Materials for Bathtub Replacement

How to Replace a Bathtub Step by Step Guide?

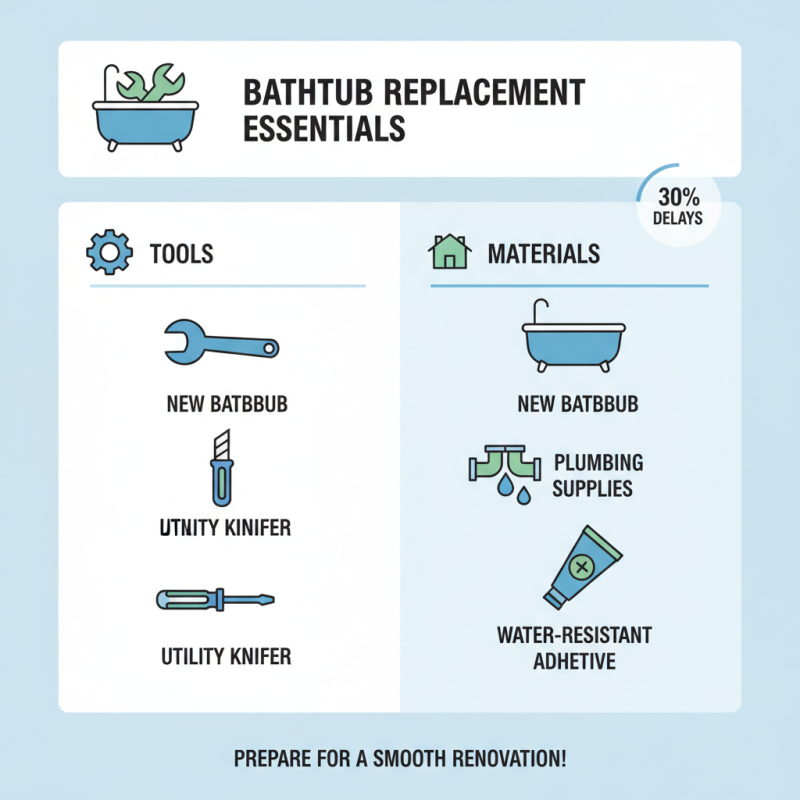
When replacing a bathtub, gathering the right tools and materials is crucial. Reports indicate that improper preparation can lead to delays, with 30% of DIYers facing unexpected issues. Essential tools include a wrench, screwdriver, and utility knife. Materials such as a new bathtub, plumbing supplies, and water-resistant adhesive are also needed.

Check for any specialized tools, like a reciprocating saw, to remove your old tub. A stud finder is helpful for ensuring secure mounting. Remember to wear safety gear while working. Measuring accurately is key, as incorrect measurements can lead to costly mistakes.

Tips: Always double-check local plumbing codes before starting. Many homeowners overlook this step, leading to compliance issues. Also, consider enlisting a friend for support. Having an extra pair of hands can make the process smoother. Be prepared for some bumps along the way, as the unexpected can often arise, such as hidden leaks or outdated plumbing.

Preparing the Bathroom: Safety Precautions and Space Organization

How to Replace a Bathtub Step by Step Guide?

Preparing your bathroom for a bathtub replacement is crucial. Safety should be your priority. Begin by clearing the area around the bathtub. Remove any clutter, including bath mats and toiletries. This will help you navigate easily.

Tips: Lay down a drop cloth to protect your floor. You might accidentally drop tools; better to be safe.

Ensure you wear safety goggles and gloves. These will protect you from sharp objects and debris. Check for any existing leaks or mold. If there is mold, treating it before starting is necessary.

Tips: Keep a first aid kit nearby. Accidents happen, and it's better to be prepared.

Organize your tools and materials nearby. Having everything at hand can save you time and frustration. However, sometimes things might not go as planned. Expect a few setbacks; it’s a part of the process. A well-prepared space can help mitigate these issues.

Removing the Old Bathtub: Step-by-Step Breakdown

Removing an old bathtub can be a daunting task, but with proper steps, it becomes manageable. Begin by turning off the water supply. This is crucial to prevent accidents. Clear the space and gather your tools: a pry bar, a saw, and pliers. Most bathtubs weigh over 200 pounds. Make sure you have help. It’s common for homeowners to underestimate the weight.

Next, disconnect the drain. Use pliers to remove the nuts underneath. This step often proves tricky, as rust or debris can build up over time. Don't force it, as damaging the pipes can lead to further issues. After the drain is removed, check the caulking around the tub. It needs to be cut away before you attempt to lift the tub.

**Tips**: Wear safety goggles. Protect your eyes from falling debris and sharp edges. If you're not confident, consult a professional. This will save time and ensure safety.

After loosening the caulk, remove the tub from its enclosure. It may require some pulling and wiggling. Be cautious of surrounding tiles or walls; they can break easily. In some cases, you'll need to cut the tub into sections for easier removal. Reflect on whether you’re equipped to handle this kind of work before proceeding.

**Tips**: Take breaks to avoid fatigue. Fatigue can lead to mistakes that may cost you. Always keep your workspace organized. This will help you stay focused and efficient.

How to Replace a Bathtub Step by Step Guide? - Removing the Old Bathtub: Step-by-Step Breakdown

Step Description Tools Needed Estimated Duration
1 Turn off the water supply and drain the existing bathtub. Wrench, bucket 30 minutes
2 Remove any surrounding fixtures, like the faucet and drain plug. Screwdriver, pliers 15 minutes
3 Carefully detach the bathtub from the wall and supports. Reciprocating saw, pry bar 45 minutes
4 Lift and remove the old bathtub from the bathroom. Helper's assistance 30 minutes
5 Inspect the plumbing and make any necessary repairs. Wrench, sealant 1 hour

Installing the New Bathtub: Proper Techniques and Tips

Installing a new bathtub can be a daunting task. Preparation is key for a smooth installation process. Start by measuring your bathroom space carefully. Ensure the new bathtub fits well in the intended area. Gather all necessary tools and materials ahead of time. This might include a wrench, silicone sealant, and a level. Missing tools can lead to frustration, so double-check your list.

When placing the bathtub, keep the wall structure in mind. Support the tub evenly to prevent cracks. Use shims if necessary to make it level. Apply a bead of silicone sealant around the edges once it's in place. This creates a waterproof barrier. Be attentive to details; even small gaps can lead to future leaks.

Testing the installation is also crucial. Run water in the tub and check for leaks. Pay attention to any unusual sounds or movements. Remember, it's normal to encounter setbacks. If the plumbing connections seem loose, take a moment to recheck everything. These challenges can teach valuable lessons for future projects. Don't rush through the finishing touches; they impact overall durability and look.

Finishing Touches: Sealing and Connecting Fixtures to Complete Setup

After installing your new bathtub, sealing it properly is crucial. Use a quality silicone caulk around the edges. This prevents water leakage. Apply an even bead, smooth it with your finger. Ensure there are no gaps or bubbles. It’s better to do this right, as any slip-ups may lead to mold growth later.

Next, connect the fixtures. This includes the faucet and water controls. Ensure they are tight but not overtightened. An insecure fixture can cause leaks. Pay attention to the plumbing connections. Sometimes, threads may not align perfectly. It is okay; take your time to adjust them if needed. Check all connections before finishing.

Finally, take a step back and admire your work. While everything may not look perfect, that’s okay. Minor imperfections make the process personal. You learned along the way, and that matters. The focus should be on functionality. A well-sealed bathtub will serve you for years, despite a few bumps in the road.

Bathtub Replacement Process: Time Taken by Each Step